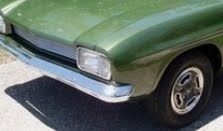


The fibreglass guard came slightly over size so that you can cut/grind it to match your particular car’s requirements. I had to grind a little section off the front of it so that it sat snug on the panel in the engine bay. The area on the corner of the windscreen was too high and the vertical gap between the guard & the door need some careful grinding down. After all of this, it was starting to look pretty good, but the corner of the bonnet had also been damaged & lining that up was causing me some grief. Andy from Pegasus has suggested I use Sikaflex adhesive with some temporary self tapping screws to attach the top & the bottom of the guard. I also attached the three screws to the front under tray and this took some time trying to align this previously damaged section. I also had to be careful not to tension the screws too tightly as I thought the fibreglass might crack. So with all the gaps lining up I stuck it all on & it looked OK. After coming back to look at it a little later in the day, I was surprised to see that the RH corner section just near the windscreen & where the bonnet lines up was about 5mm too high & that was really annoying to me.
After thinking about it that night, I really wanted to take the guard off again & get that section sorted out. I consulted my neighbour, KH, again & he suggested a hot knife would cut through the Sikaflex. However, a knife would not be long enough to cut through the length of the guard but it set me thinking & a trip to Bunnings provided me a strip of thin aluminium (1.4 m x 1cm) – just what I wanted. At home, I sharpened one end with the grinder & heated it up with the heat gun & then slid it up between the fibreglass guard & the original body metal. Without too much effort, I had cut it through to the end & was able to get the guard off without any damage, which was a great relief. It was fortunate for several reasons that I had removed the guard, one being that there was not a lot of adhesive in some areas but more importantly was the fact that I would not have been able to attach the inner fibreglass support section properly with the guard attached. I spent the rest of the day grinding down the offending area & using as many clamps as possible to hold the guard in place so as to get the correct angles & spaces.Another good result for the day was that I contacted Steven L (Redland Bay Auto P & P) to see if he was interested in a paint only job. Steven had repainted my white Capri XL about 6 years ago & I was very happy with the job. Surprisingly, he said he was and gave me an approximate price which was I thought was very reasonable but he was not able to do it until June. What was another 4-5 weeks, and that would give me plenty of time to get the body ready so I was pretty pleased about this.
It was now the first week in April, & I wanted to get this guard finished today. I spent considerable time attaching the inner support section as it had to be positioned exactly to match the contours of the guard. When I thought all the angles & spaces were correct I used copious amounts of Sikaflex on the top, down the side, inside on the support panel & along the bottom as well as about 5 G clamps, & pieces of wood to put pressure on the side where the inside panel attached and any thing else necessary to attach the guard. Finally, I was reasonably happy with how it looked. I then left this for several days.
LESSON 14A: Nothing is ever easy, especially attaching fibreglass front guards.
LESSON 14B: A hot knife or a hot aluminium strip will cut through Sikaflex.
LESSON 14C: Get the inner support section correctly attached and fitting the contours of the guard before the final fitment of the guard.


No comments:
Post a Comment