While stuffing about with the heater, I did a number of the myriad of other things that you need to do to finish the car. One was to refit the external rear vision mirror that I had found very difficult to remove. I had the mirror part redone & now, how was I going to get that top screw back in when I needed arms about 2 metres long. After dropping the nut inside the door about 20 times, I had a remarkable idea. Why not stick the nut onto the end of my finger with a squirt of Bostick & then try. Guess what? Had the nut going on the screw on the first attempt.
LESSON 23: To try and attach nuts to screws/bolts in really difficult out of sight places, stick the nut to your finger with Bostick! Works every time!! (I only had to do it once!)
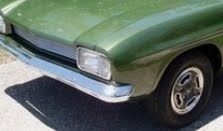
Lots of other things were completed like putting the letters & badges on & finally getting the area around the RH headlight looking OK. (That was the area that was damaged). I had tried several times to clean the roof lining but still had not been able to completely get rid of the stain in some parts so I have settled for it as is because I fear damaging the lining even more. I was also keen to fit the new radio that I had purchased months earlier at an Autobarn sale. Guess what? It wouldn’t fit!! The dial knobs were quite different to the ones in the dash & I had no intention to drill another lot so the old radio was found. I decided to fit the cheap speakers behind the dash with a few small metal supports. With the wires & speakers connected, it works OK but doesn’t have a great sound but what the heck? Anyone want a cheap new car radio? It was cheap!
LESSON 24: Even check radios to see that they will fit the existing dash holes & slots.
WELCOME TO MY BLOG WHICH TELLS THE STORY OF THE RESTORATION OF MY 1970 FORD CAPRI 1600 DELUXE
Subscribe to:
Post Comments (Atom)
Counter

No comments:
Post a Comment