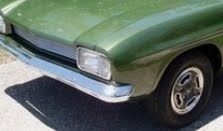


By this time it was the end of September & it was time to get serious about the wheels & tyres. Yes, I would really like some Minilites but they will have to wait. I made quite a few calls & it is very hard to find 175/75/13 tyres. I ended up locating a full set of slightly used Goodyear GT3s for $160 from Apache Wholesale Tyres at Rocklea. (They also supplied the 7/16 chrome wheel nuts that I had been chasing for some time.) With the new tyres on, the rims cleaned sprayed gloss black & the chrome wheel trims cleaned & polished, the car was starting to look quite different. In fact, it was starting to look good!
Next were the wipers & windscreen washers. It took ages to get the new blades on & the wipers on the spindles. Then when I turned them on – guess what? THEY TURNED THE WRONG WAY! What the f****** was going on? After all the previous trouble what had I done wrong? Was the motor connected the wrong way? I was too depressed to do any more on the wipers so I started on the washers. I had bought a new Haighs radiator overflow bottle to use as the water reservoir as finding a good original Capri water bottle was impossible. I re-positioned the rubber pump on the firewall inside & after connecting all the plastic hose, water went flying over the roof after few pumps. Good – something else working!
More bits to put back eg. hockey sticks (OK with a clean & a polish), number plate light, interior door handles, side front bumper bar bolts, bonnet stops, rear window chrome locking strip (What a really hard & terrible job that was!) & more webbing to the front passenger’s seat. Getting there except for the wipers & the motor sounds really terrible at the moment. It sounds as if one cylinder is missing so I hope it is no great problem.
8th October was the WORST day of this rebuild and I hope someone hits me around the head & makes me see sense. I will never do another restoration!!! I decided the wipers had to be fixed once & for all times! I had to disconnect a lot of the wiring under the dashboard, undo some of the heater controls & a few other things so that I could withdraw the wiper assembly. I tried to reconnect the wiring in reverse & after a very quick smell of burning, I pulled off all the wires & decided that was not the solution. SO, ALL THE WIPER ASSEMBLY HAD TO COME OUT AGAIN! I was getting well practised at this and with a bit of jiggling, I was able to withdraw it. I consulted all the manuals, looked at my other Capri & discovered that the small arm straight off the motor to the arms was 180 degrees out. Would this really fix it? After about three goes it seemed to be working the way it should. Now to put it all back & don’t forget I am not young, half blind, half deaf & really don’t like doing gymnastics under a Capri dash. Well, it finally went back in & with all the wipers connected it was eventually doing what it was supposed to do & even the stopping mechanism was working correctly. Finally, the wipers are working. Hurrah & three cheers!!!!
LESSON 25A: Nothing is ever easy especially replacing the wiper assembly, even after the fourth time.
LESSON 25B: Take plenty of photos & mark where all the wiper arms go together unless you want to do it four times like I have.

No comments:
Post a Comment