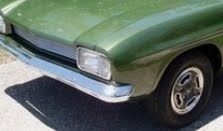
The next day, the re-birth of the JG (Jewel Green) Capri began. It took me nearly all day to clean out all the bits of rubbish that were in the car. I found everything from blankets, ties, videos, jumper leads, letter openers and log books to wasp nests. There were wasp nests everywhere! I also found a section of the previous registration label which indicated that the car was last registered in 2003. No luck with any key but there was a type of locker key which did turn the ignition. Any attempts to start the car failed miserably as the battery was stuffed & even after attempts to charge it overnight, it didn’t want to turn over. As I was about to go away, I decided to attack the damaged front guard. It took ages getting all the damaged screws out as I did not want to break the main headlight which for same reason was still intact. I knew getting the guard off would be difficult as they are welded on so I drilled out as many welds as I could but it still wasn’t easy removing the top seam. Some parts came away cleanly but I became impatient & got pretty angry with the cold chisel. This resulted in cutting part of the top off like a jam tin & I regretted this later on.
LESSON 2: Be very patient removing the front guards & try to keep the edges as clean as possible as good replacement front guards are rarer than hen’s teeth.

After returning from my trip, I was determined to get the engine running so after a new battery, cleaning all the plugs, and re-setting the points, I had a go. Well, I soon realised it was a no go! I poured a bit of petrol down the carbie throat, turned the key & surprise, surprise – it ran for a few seconds. A bit more fuel & it ran a bit longer & sounded not too badly so that gave me a bit of a kick and suggested that fuel was the problem. Not surprising really seeing the car had been sitting for a number of years. So, I soon realised that if I was to do this properly, then the whole fuel system (tank, pump, filter & carbie) would need to be cleaned out. The pump, filter & carbie were very dirty & I replaced the pump & filter & gave the carbie a good clean. Removing the fuel tank is a bugger of a job but after doing it about three times I can suggest these hints.
LESSON 3A: If the car has not been used for a considerable time, then the fuel tank will need to be removed & cleaned out. I used a high pressure water hose & then metho to dry it out. My garden leaf blower was very useful for cleaning & drying out the fuel tank. It certainly helped remove any moisture that was remaining in the tank.
LESSON 3B: It helps a great deal to take out the back seat when removing the fuel tank. When replacing it, loosely fit the two top bolts & tighten after the rubber joining hose has been fitted. The fuel hose joining to the tank outlet pipe will possibly need a new connection.
LESSON 3C: Fitting the joining hose from the filler pipe to the tank was one of the worst jobs I can remember doing. I had to buy a replacement piece of fuel pipe which was not very flexible so after several attempts I found the best way was to loosen the screws on the filler pipe & using detergent slip the hose on that end & then slide the other end over the fuel tank main filler pipe.


No comments:
Post a Comment