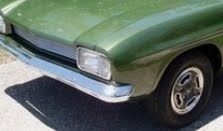
I really needed to be able to have the car going enough to move it around my yard, so after all the fuel system cleaning, I was hoping to have it going. After I put a few litres of fuel in & sucked the fuel through to the fuel pump, it was time to see if it fired. Yes, it went & not too badly after I had replaced the spark plug leads!! Now could the car be moved under its own power was the next question. I couldn’t get it into any gear & I now I knew why there was a spare gear box in the boot & this all left me a bit depressed. Back to all the manuals & then tried a bit of clutch adjustment by slacking off the cable locking nuts. Yes, this did it! I could get it too actually move & I drove it onto to the road & backed it in the other way. I also soon learnt that there wasn’t much to the brake pedal so I used the hand brake to stop, but, at least I could move it to where I could work on it.
LESSON NUMBER 4: If the car has been standing for a considerable time, the clutch cable may need to be released to relieve the pressure on the clutch plate & then re-adjusted.

Now, back to the removal of the front guard! I really needed to take the RH door off as the guard couldn’t be removed without getting behind the door. After copious amounts of spraying WD 40 & INOX, I had a go at removing the door pins. Not the slightest bit of movement was obvious and the angle of getting the top one out was very difficult. I also found out, after removing all the mud & gunk, that the door pins are hollow! There had to be a simple way to do this, so I rang MF from the Capri Club & asked his advice. He suggested the easiest way was to unbolt the hinges from the body by undoing the bolts located behind the front side kick panels. He also suggested replacing the nuts as they can become easily worn & then difficult to replace in the future. So, now it was time to remove the front panels on both sides & at the same time, I removed the front & rear parcel trays. I was very surprised at the good condition of the rear one even after it had two speakers mounted on it. At this stage the front inertia retractable seat belts were removed, as were all the carpets & underfelt. It seemed that previous owners have looked after this car pretty well as the floor had just one small rust hole and had been painted with Killrust. Previous rust repairs to the door pillars had been done and there were a few small sections at the top of the doors that needed attention, so that was all good news. I could also easily locate the nuts holding the door hinges & again with the help of huge amounts of INOX, I was able to get the 6 nuts off & then remove the RH door. It is very surprising where one finds the wasp nests, even under the dash board!
LESSON 5: It is easier to get to the door pins if the doors are off and if the nuts holding the hinges look worn, replace them.


No comments:
Post a Comment