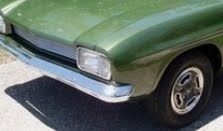

 With the help of a cold chisel & a big hammer, I removed the part of the guard which is welded to the side of the body. This revealed some rust areas, not major, and again, a number of areas where rust repairs had previously been done by welding in new small panels. Undoing the screws which held on the front section of the guard to the light assembly was not so easy due to the damage that had been caused by the accident. Removing the grill gave greater access & with the help of a hacksaw, I eventually was able to separate the guard from the body. The front section is a real mess & I doubt if it can be repaired. All the interior panels & seats were removed, just leaving the driver’s seat so that the car could be moved to different areas of my house. Again I was surprised by the number of wasp’s nests and the general condition of the body. There was also some sand in the bottom of the front panels & this would need to be removed. All the interior panels & seats were in quite good condition but very dirty.
For the next few days, I attacked the interior & the underside of the car. It was all cleaned & I used the wire brush on the grinder to clean up everything as much as possible. Everywhere, both inside & outside, I sprayed fish oil, especially in the interior panels. I also sprayed Killrust on the interior floor and around the back seat area. Underneath the front was sprayed with rubberised black paint & black spray paint. I also applied black bituminous paint everywhere I could on the underside of the body. I was aiming to get as much of this done on my outside area before I parked the car under the house for the next stage. Most of the exterior trim bit was also removed & some with a fair degree of difficulty.
LESSON 6: When removing trim all the screws except one will unscrew easily. Be patient and have at the ready a can of WD40 for the recalcitrant screw, nut or bolt.


Next was the dashboard area! I had taken some pictures of it and after removing the surrounding panel & crash panels, I had the tape ready to label everything. Again, all the vinyl covered parts were in surprisingly good condition. Also, once again, I discovered wasp’s nests everywhere. They were attached to nearly every panel. The instruments appeared OK but I wasn’t really sure what was working. I knew some of the lights were but I couldn’t get the wipers or fan to operate. The wiring was a bit of a mess so I stuck labels on as many wires as I could. The heater looked OK & there was no evidence that it had been leaking so this was a good sign but yet to be confirmed. So, much of the dismantling & cleaning of the body had been done & it was time to move it under the house. It was about Christmas time 2008 and I knew that little would be done over the next few weeks & the hot weather doesn’t encourage one to be too energetic.
LESSON 7: Take more pictures than you think are necessary and label everything that moves under the dash. When it comes to putting it all back in about 6 month’s time, you will be constantly referring back to the pictures and the labels. Don’t be surprised to find wasp’s nests in the strangest of places.


No comments:
Post a Comment